Sandy Bridge, the Complete Overclocking Guide
Overclocking Practice – Test Bed

These are the hardware components used as our testbed in this overclocking guide article:
- CPU : Intel Core i7-2600K (Retail Stepping D2)
- Motherboard : MSI P67A-GD65, BIOS 1.7B3 & 1.7B4
- RAM : Kingston HyperX 2x1GB DDR3-2333C9
- Graphics Card Digital Alliance GTX 580 1536MB
- HDD : Seagate 250GB Sata
- PSU : CoolerMaster SilentPro Gold 800W
- HSF : Noctua NH-D14
- OS : Win 7 Ultimate 32-bit
MSI P67A-GD65 BIOS
Note: The BIOS settings described in this article are based on the parameters found on the MSI P67A-GD65 motherboard. Some of the parameter names/ terms may vary on other motherboards.
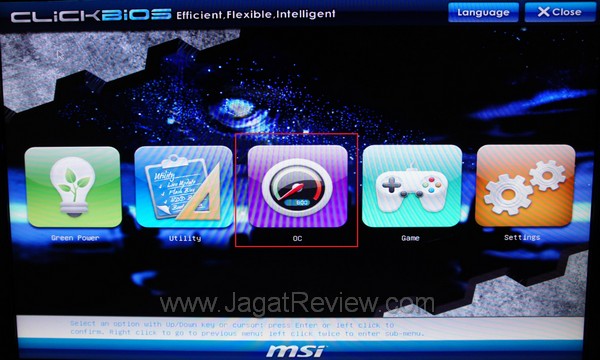
We’re now entering the BIOS menu of MSI P67A-GD65 motherboard. MSI has implemented the UEFI (Unified Extensible Firmware Interface) on this particular motherboard, resulting in a somewhat-friendlier BIOS interface.

The overclocking parameters can be accessed by clicking the “OC” icon in the middle , but before we get into that, let’s reset all the settings to their default values first. Press F6 to bring up the “Load Optimized Default” option. Select “Yes”, then save your setting and exit the BIOS (F10).
General Settings
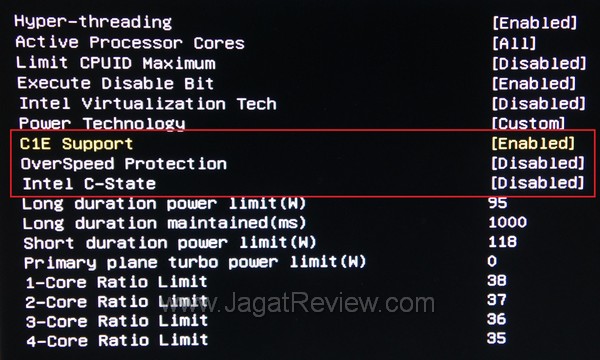
Soon after you’ve entered the OC menu, look for the bottom most sub-menu, the CPU Feature. Here, change the parameters as follows:
Intel C-State [Disabled]
Overspeed Protection [Disabled]
C1E Support [Enabled], leave others at their default settings,
The final screen should look like this:

Press “esc” to exit to the main OC menu
CPU & DRAM Settings

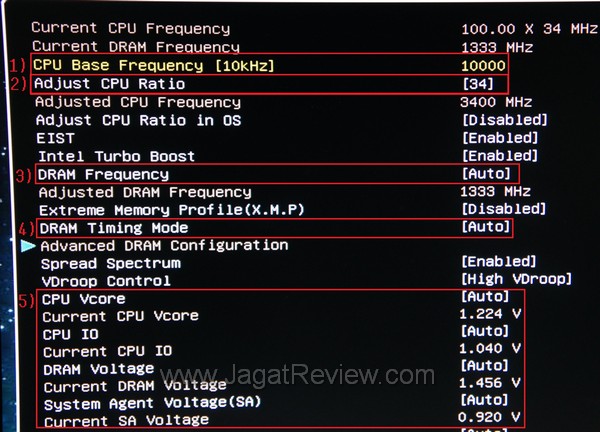
These are the settings that you have to adjust accordingly:
1) CPU Base Frequency [10kHz] :
This is your Base Clock(BCLK) value, measured in 10KHz units (not MHz). The default value of this variable is 10000(10000 x 10Khz = 100000kHz = 100Mhz). For now, we can leave it as it is. We need to concentrate more on the CPU multiplier part.
2) Adjust CPU Ratio :
Yes, this is your CPU multiplier. The default multiplier value for the Core i7-2600K is 34. You can increase this number to achieve higher operating frequencies.
3) DRAM Frequency :
The operating frequency of your RAM modules can be adjusted here. By default, the value is AUTO, which means DDR3-1333Mhz. Increase this value to a higher rate if you want to speed up your RAM.
Additional note: As we have previously mentioned in the “Sandy Bridge Overclocking Concept” section, the DRAM frequency setting actually represents the “DRAM Multiplier”, while the RAM frequency itself is obtained from the multiplication result between your current CPU BCLK and the DRAM multiplier. MSI makes no clear mention of this DRAM multiplier in the BIOS menu. Instead, the resulting speed obtained from the multiplication between your CPU BCLK is directly displayed. This final value varies according to the BCLK frequency.
4) DRAM Timing :
You can adjust your DRAM timing here. In the mean time, we can leave it at [AUTO]. We’ll be focusing our efforts on the CPU clock and DRAM clock.
5) Voltage [CPU VCore], [CPU IO], [DRAM Voltage], [System Agent Voltage]
These settings regulate the different voltages on your Sandy Bridge system. Look at the voltage table on the previous page for reference.
These five settings are all that you need to adjust for now, leave others at their default values.
Settings Example
Below is our recommended configuration for overclocking with all the voltage settings set at their strong>DEFAULT values.


